

Lower cost alternative to a Van Conversion
Excessive price increases caused by inflation, COVID and supply chain distress are posing a new threat Vanlife enthusiasts. With commercially converted vans base prices approaching $100,000, Vanlifers are looking for cheaper alternatives. The COVID crisis of 2020 has done much to popularize van living and made it fashionable to live and work off-grid, while offering…
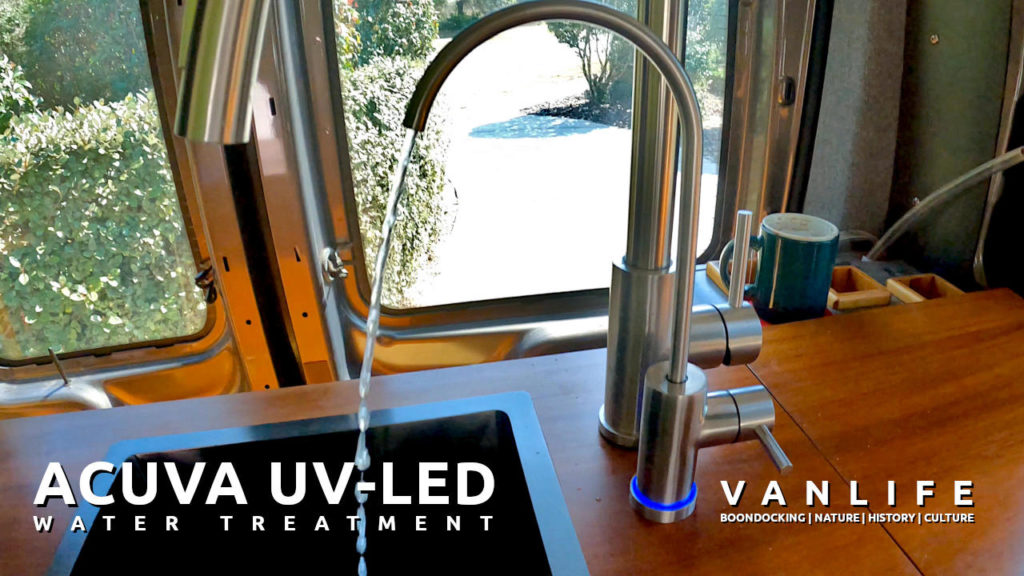
Acuva ArrowMAX 2.0 UV-LED Water Treatment System
https://youtu.be/7Y7SuXKHTaw NOT a sponsored article.I bought this water treatment system myself as a hopefully better replacement of my Berkey water filter. Acuva ArrowMAX 2.0 UV-LED The Acuva system works with a pre-filter and an UV-Led to clean the drinking water in my van, during my travels through the US. It comes with an optional faucet…

Above the Clouds
This trip in the fall of 2022 will lead me on a 14-day hiking tour of northern Georgia, southern Tennessee and a slice of North Carolina While testing the van out for permanent Van Living, I visited the following locations: Wayah Bald Fire Tower ➜ 35.1801, -83.5608 Wilson Lick Ranger Station ➜ 35.1628, -83.5845 Albert…

Hiking to Wesser Bald Fire Tower
This trip in the fall of 2022 will lead me on a 14-day hiking tour of northern Georgia, southern Tennessee and a slice of South Carolina While testing the van out for permanent Van Living, I visited the following locations: Conasauga Falls TH Boondocking ➜ 35.3077, -84.3288 Bald River Falls ➜ 35.3246, -84.1777 Whiteoak Creek…

Victron Multiplus 3000 Van Conversion Installation
Multiplus 3000 Up till now I have operated the van without an inverter and several appliances went unused (ic. water heater and induction cooktop). Just being able to use the cooktop will make a major difference while living in the van. (Un)fortunately, the charger part of the Multiplus will only be used infrequently, as I…

Creek Crossings and Spectacular Views
This trip in the fall of 2022 will lead me on a 14-day tour of northern Georgia, southern Tennessee and a slice of South Carolina While testing the van out for permanent Van Living, I visited the following locations: High Shoals Fall Boondocking ➜ 34.8028, -83.7191 Wagon Train TH ➜ 34.8711, -83.8093 Brasstown Bald TH…

Fall at the Falls
This trip in the fall of 2022 will lead me on a 14-day tour of northern Georgia, southern Tennessee and a slice of South Carolina While testing the van out for permanent Van Living, I visited the following locations: Unicoi Gap Boondocking ➜ 34.8017, -83.7428 Unicoi Gap TH ➜ 34.8017, -83.7428 High Shoals Fall TH…

I am in LOVE!
This trip in the fall of 2022 will lead me on a 14-day tour of northern Georgia, southern Tennessee and a slice of South Carolina While testing the van out for permanent Van Living, I visited the following locations: Last Nights Boondocking ➜ 34.7094, -83.7889 Raven Cliffs Trail ➜ 34.7094, -83.7889 Dukes Creek Falls Trail…

One Day, Four Hikes
This trip in the fall of 2022 will lead me on a 14-day tour of northern Georgia, southern Tennessee and a slice of South Carolina While testing the van out for permanent Van Living, I visited the following locations: Woody Gap Boondocking ➜ 34.6778, -83.9996 Preachers Rock ➜ 34.6871, -83.9939 DeSoto Falls TH ➜ 34.7064,…
Hiking Grassy Mountain and Toccoa Bridge
This trip in the fall of 2022 will lead me on a 14-day tour of northern Georgia, southern Tennessee and a slice of South Carolina While testing the van out for permanent Van Living, I visited the following locations: Grassy Mountain TH ➜ 34.8557, -84.6579 Grassy Mountain Lookout Tower ➜ 34.8619, -84.6698 Fall Branch Falls…
FOLLOW US
Stay Up to Date with Cargo Van Conversion’s Digital Newsletter!


