
Water Pump
Choice and installation of the pump, add-ons and accessories.
In this chapter I’ll show some popular selections for RV water pumps and show a way to attach it to the interior of the Fresh Water Tank base unit.

All of these RV pump units are very similar and usually only capacity (psi/gpm), warranty and cost differentiates them. Most ~55psi units are sufficient for small RVs like a van conversion.
An accumulator reduces pump cycling, but if you primarily boondock, you will usually shut off the pump after each use, making this an optional installation.
Some of the accessories are also used in other parts of this water tank project and other projects of this build. It may be wise and cost effective to figure out in advance, how many of each you need for the entire build; you can also have a look at a Comprehensive Material List for most of the parts of this Fresh Water Tank Project.
Which Parts To Choose
This page may contain affiliate links that I am compensated for at no cost to you. Please check out my privacy policy for full details, and thank you for supporting the site!
BUILD GUIDE UPDATE
Be the first to receive an update, when a new Project is added to this Build Guide. I also include a monthly overview of newly posted videos.
Water Pumps
Recommended1
SHURflo 4008
1 Pump with Strainer
12/120 Volt
3.0 GPM
55 PSI
7.5 Amps
Warranty 1yr
8.1″ x 4.9″ x 4.3″
Weight 5lbs
SEAFLO 42
12 Volt
3.0 GPM
55 PSI
Warranty 4yr
7.97″ x 4.92″ x 4.37″
Weight 4lbs
55AQUAJET-AES
12 Volt
3.4 GPM
60 PSI
10 Amps (max)
Add-ons
SHURflo Accumulator Tank
Reduces pump cycling
12 Volt
Warranty 1yr
9.1″ x 4.8″ x 3.8″
Weight 1lbs
SHURflo Strainer
0.5 Inch
NPSM Thread
Warranty 1yr
SEAFLO Strainer
0.5 Inch
NPSM Thread
Warranty 4yr
Materials
Braided Hose
0.5″ ID x 0.75″ OD – 10 Ft High Pressure Braided Clear PVC Tubing, BPA Free and Non Toxic
Hose Clamps
20pcs – Stainless Steel Adjustable Clamps. Fit 1/2″ 5/8″ 3/4″ Hose.
Shut-off Valve
1/2″ Hose Barb Shut Off Valve with Clamps for Water. (2 pieces)
One Way Check Valve
1/2″ Hose Barb Non Return Ozone Resistance Plastic Valve for Water (3 pieces)
Swivel Adapter
1/2″ Swivel to 1/2″ Barb Straight Wingnut Swivel Adapter (2 pieces)
Brass Hose Fitting
90 Degree Barbed Elbow, 1/2″ Hose I.D. x 1/2″ Hose I.D. (2 pieces)
Tools
Hole Saw Kit
17-Piece Hole Saw Set, 3/4″ to 5″ Hole Saw with Mandrel for Wood, Plastic and PVC.
Water Pump Installation
Placement of the water pump and immediate hoses & fittings.
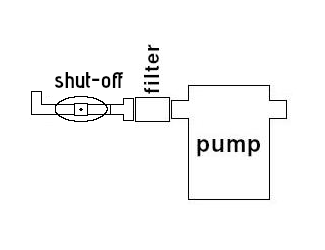
The water pump to be located preferably inside the cavity under the water tank and next to the rear wheel well, as long as it is readily accessible. A strainer before the pump removes debris and a check valve protects the water in the tank.
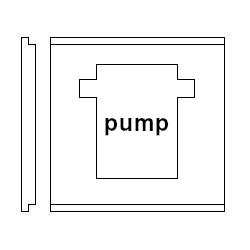
1. Create a small back plate (approx. 6″x6″) with shoulders on two sides, onto which the pump is placed.
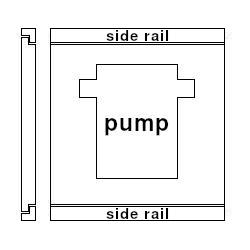
2. Create two 6″ side rails; glue and screw them at a convenient place, preferably below the tank floor, onto the inside side wall of the base unit.
3. Use screws to attach the water pump to the back plate. Slide the back plate between the side rails and use one screw to hold the water pump in place. If the pump ever needs service, remove the one screw to access the pump.
4. Add the strainer to the ‘inflow’ side of the pump, then add a straight swivel adapter, then add a shutoff valve followed by a 90° hose connector, pointing upwards.

5. Locate and drill a 0.75” hole through the floor that holds the water tank, right above the 90° connector.
6. Add a straight swivel connector to the ‘outflow’ side of the pump and use a clamp to add a short piece of 0.5” ID reinforced drinking water hose*. Use a clamp to add a check valve to the other end of this hose. This check valve will be connected to the sink and/or water heater after they are installed.

*lengths of the hoses are dependent on your specific situation.
materials
- water pump
- pump strainer
- straight swivel adapter
- shut-off valve
- 0.5″ – 90° hose adapter
- 0.5”ID reinforced drinking water hose
- hose clamps
- 0.5″ check valve
tools
- drill
- 0.75” hole saw
QUESTIONS, SUBMISSIONS OR CORRECTIONS
The missing parts of the complete van conversion process are being added regularly to this Build Guide. If you want to suggest a specific build option for this guide, submit a content correction or have a general inquiry, send me an email.
Error: Contact form not found.
Disclaimer: Throughout this guide, all guidance, building techniques and other information are based on my own experiences of converting a cargo van into a Tiny House on wheels. This guide is only for informational purposes; always build according to local and national standards. Be aware that such a project is expensive, requires a substantial amount of broad knowledge of building techniques and involves more work hours than you can imagine. Besides of hitting a finger with a hammer, much more serious harm can be done when you work with 12V/120V electrical systems, propane installations, power tools, etc. Tapping into the vehicle’s own systems can also damage its functionality. Get professional help where needed; never take any risk!
References:
1Recommended: A low-cost item with generally good performance.