
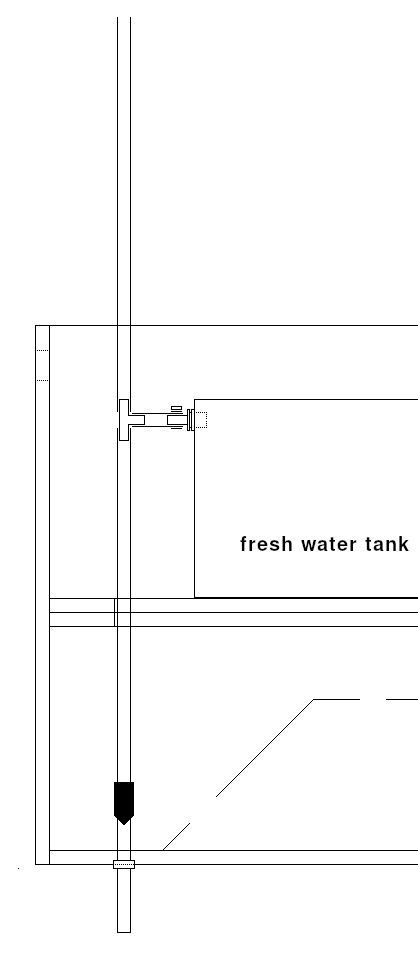
Fill Vent
Installation of the vent hose.
The vent line is an important part of the water tank installation; it prevents pressure build up that can lead to disastrous burst of the tank.

Some of the accessories are also used in other parts of this water tank project and other projects of this build. It may be wise and cost effective to figure out in advance, how many of each you need for the entire build; you can also have a look at a Comprehensive Material List for most of the parts of this Fresh Water Tank Project.
Which Parts To Choose
This page may contain affiliate links that I am compensated for at no cost to you. Please check out my privacy policy for full details, and thank you for supporting the site!
BUILD GUIDE UPDATE
Be the first to receive an update, when a new Project is added to this Build Guide. I also include a monthly overview of newly posted videos.
Materials
Clear Vinyl Tubing
0.5″ ID hose
10 feet
Low Pressure Applications
One Way Check Valve
1/2″ Hose Barb Non Return Ozone Resistance Plastic Valve for Water (3 pieces)
0.5″ Brass Barb Tee Fittings
Pack of 2
1/2″ ID Hose Fitting
6pcs SS Clamps
Nylon Cable Clamp
0.75″ Diameter
Hose Clamps
20pcs – Stainless Steel Adjustable Clamps. Fit 1/2″ 5/8″ 3/4″ Hose.
GE Silicone Caulk
2 Pack
Clear
10.1 Oz
Black Undercoating
20 oz
Tools
Hole Saw Kit
17-Piece Hole Saw Set, 3/4″ to 5″ Hole Saw with Mandrel for Wood, Plastic and PVC.
Fill Vent Installation
Installation of the vent hose.
The 0.5” tank vent allows the air inside the tank to be released, when filling the tank with fresh water. While too narrow to be fully sufficient as an overflow, it can also help ease the situation in case of over-filling.
1. Cut the hose to the appropriate lengths (from the tank, the hose has to rise at least several feet).
2. Attach the hose to the rear pillar and inside cabinet wall with nylon wire clamps.
3. Before the hose exits the van and close to the floor, insert the check valve (with the flow arrow down) and fasten it with hose clamps.
4. Drill a 0.75” hole through the floor and guide the hose end through it.
5. Add a liberal amount of silicone caulk between the floor and the hose, to prevent critters from entering the van.
6. Optional: Spray some undercoating on the outside of the hose and below the vehicle floor.
materials
- 0.5” vinyl hose
- 0.5” check valve
- nylon wire clamps
- silicon caulk
- hose clamps
- optional: undercoating
tools
- drill
- hole saw
- screwdriver
QUESTIONS, SUBMISSIONS OR CORRECTIONS
The missing parts of the complete van conversion process are being added regularly to this Build Guide. If you want to suggest a specific build option for this guide, submit a content correction or have a general inquiry, send me an email.
Error: Contact form not found.
Disclaimer: Throughout this guide, all guidance, building techniques and other information are based on my own experiences of converting a cargo van into a Tiny House on wheels. This guide is only for informational purposes; always build according to local and national standards. Be aware that such a project is expensive, requires a substantial amount of broad knowledge of building techniques and involves more work hours than you can imagine. Besides of hitting a finger with a hammer, much more serious harm can be done when you work with 12V/120V electrical systems, propane installations, power tools, etc. Tapping into the vehicle’s own systems can also damage its functionality. Get professional help where needed; never take any risk!