
Water Tank Assembly
Installation of the water tank and connection of the hoses.
After preparing for the assembly of this fresh water base unit, it is time to install the water tank and connect all the hoses. If you haven’t done so yet, assemble the base unit and check how it fits in the van.

Some of the accessories are also used in other parts of this water tank project and other projects of this build. It may be wise and cost effective to figure out in advance, how many of each you need for the entire build; you can also have a look at a Comprehensive Material List for most of the parts of this Fresh Water Tank Project.
Which Parts To Choose
This page may contain affiliate links that I am compensated for at no cost to you. Please check out my privacy policy for full details, and thank you for supporting the site!
BUILD GUIDE UPDATE
Be the first to receive an update, when a new Project is added to this Build Guide. I also include a monthly overview of newly posted videos.
Materials
Galvanized Hanger Strap
0.75 in
10 feet
28 gauge
galvanized
Thread Sealant
1.75 oz
white
Clear Vinyl Tubing
0.5″ ID hose
10 feet
Low Pressure Applications
Hose Clamps
20pcs – Stainless Steel Adjustable Clamps. Fit 1/2″ 5/8″ 3/4″ Hose.
0.5″ Brass Barb Tee Fittings
Pack of 2
1/2″ ID Hose Fitting
6pcs SS Clamps
Braided Hose
0.5″ ID x 0.75″ OD – 10 Ft High Pressure Braided Clear PVC Tubing, BPA Free and Non Toxic
PEX Clamps
30 pieces
0.5 Inch
Stainless Steel
PEX Pipe
Blue/Red/White
0.5 Inch
25 Foot Coil
Pex Fittings Assortment
0.5″ Fittings
10 Straight
10 PEX 90 Degree Elbow
10 PEX Tee
Brass
Nylon Cable Clamp
0.75″ Diameter
18 Gauge Wire
40 ft
12V/24V
red/black
Accessories
Most of the associated plumbing connections can be acquired as a separate plumbing kit, when buying the appropriate fresh water tank. This includes the fittings for the gravity feed.
21 Gallon Fresh Water Tank
& RV Plumbing Kit
NSF Approved
34” x 9” x 16”
Thickness 7/32” +/-
Plumbing Kit included
40 Gal Fresh Water Tank
& RV Plumbing Kit
NSF Approved
39.5″ x 13” x 18”
Thickness 7/32” +/-
Plumbing Kit included
.
RV Fresh Water Tank Fill Hose
3 Feet
1.25″ ID Fill Hose
Food grade PVC
Tools
Pex Crimping Cinch Clamp Tool
for Clamp Size 3/8″-1″
Alloy Steel
Blue
PEX Pipe Cutter
0.125″ – 1″
Water Tank Assembly
Installation of the water tank and connection of the hoses.
After preparing for the assembly of this fresh water base unit, it is time to install the water tank and connect all the hoses. If you haven’t done so yet, assemble the base unit and check how it fits in the van.
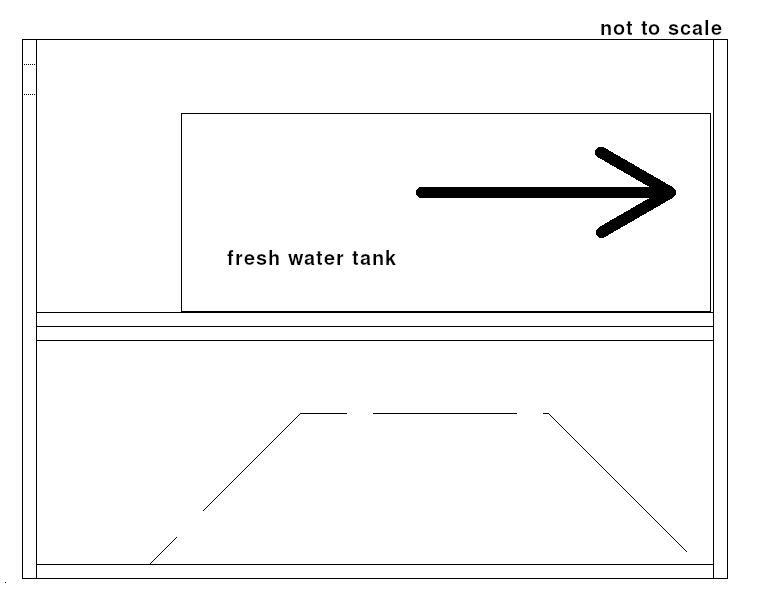
1. Place the fresh water tank on the 1” elevated plywood floor of the base unit with the side, facing the front of the vehicle against the side panel, leaving the remaining space between the side of the tank with the access points to the tank and the side panel facing the rear of the vehicle.
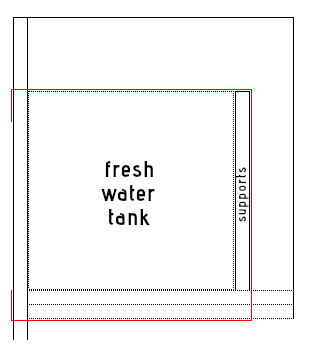
2. For larger water tanks: Back in the workshop, prepare two 3”-4” wide, 0.5” plywood strips with the same length as the height of the tank and place them at equal distances against the side of the tank. They will function as supports and will prevent the tank from bulging, when filled up with water.
At each support, guide the metal strap along the bottom of the tank floor and through the back panel of the base unit and fasten it at the end and along the bottom plywood floor. Continue upwards along the face of the supports and top of the tank to and through the back panel again. Fasten again to the back panel.

3. After the tank is installed and fastened to the base unit, insert the prepared water pump unit.

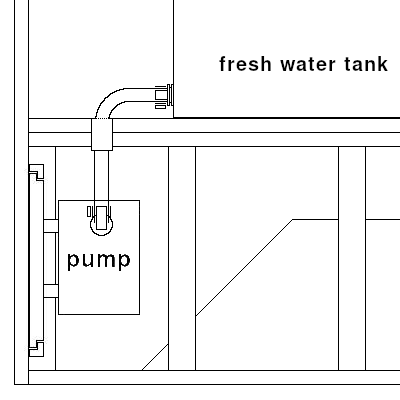
4a. Install the 0.5” NPT-to-Barb connector with some thread sealant to the 0.5” bottom opening of the tank.
4b. Without water level: connect a 0.5” flexible hose to it with a metal hose clamp and guide the hose down through a hole in the tank plywood floor and make a connection to the 0.5” NPT-to-Barb at the debris filter of the water pump.
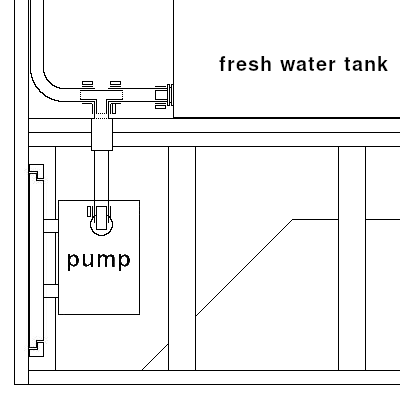
4c. With water level: connect a short piece of 0.5” flexible hose, on one side to the NPT-to-Barb connector and at the other side to a 0.5” T-connector. Connect the prepared water level hose also to the T-connector. And the third connection to a flexible hose, which is guided down through a hole in the tank plywood floor to the 0.5” NPT-to-Barb at the debris filter of the water pump.
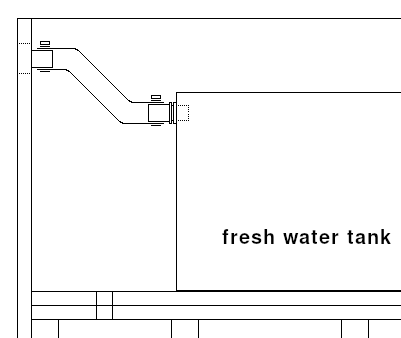
5. Insert the (usually) 1.5” NPT-to-1.25” Barb connector into the large hole at the top of the tank with some thread sealant. Connect the 1.25” gravity feed hose with a metal hose clamp.
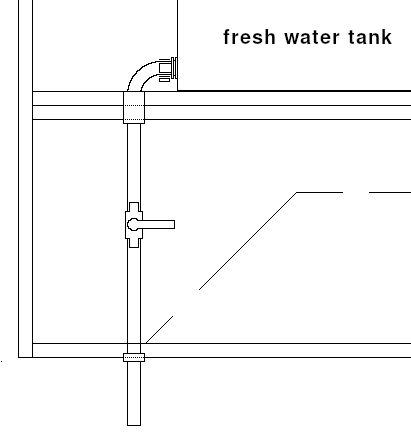
6. Insert a 1.5” x 0.5” PVC Bushing with thread sealant into the large hole at the bottom of the tank; add the dump hose with the NPT-to-Barb connector.
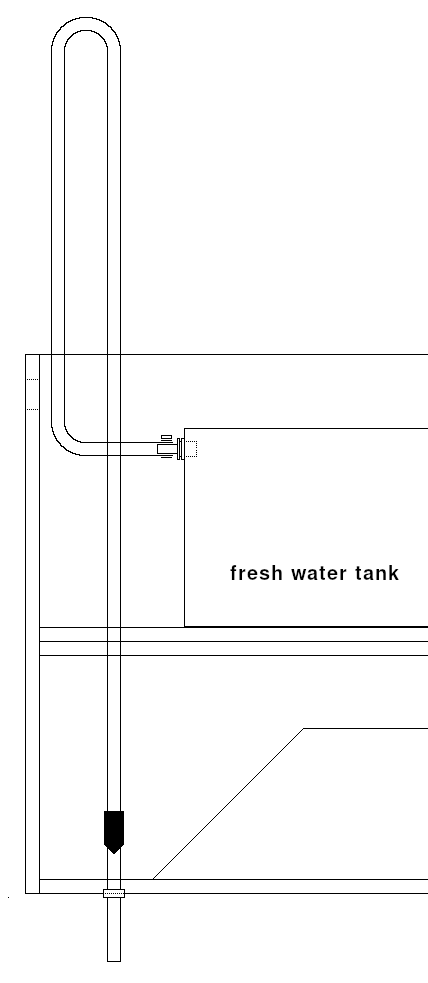
7. Insert a 0.5” NPT-to-Barb with thread sealant into the small hole at the top of the tank and connect the fill vent hose.
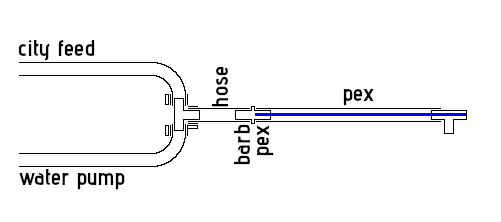
8. Connect the hose coming from the water pump with the hose from the city feed to a 0.5” T-connector. Continue with a short piece of 0.5” reinforced hose and add the 0.5” Pex-to-Barb connector.
With the optional exterior shower, continue with a short piece of 0.5” Blue Pex pipe and add a 0.5” Pex T-connector. From here attach blue Pex pipe back to either the cold shower quick-connect or to the temperature regulated shower valve. In the later case, connect a 0.5” Red Pex pipe to the shower valve and guide it back to the end of the Blue Pex pipe.
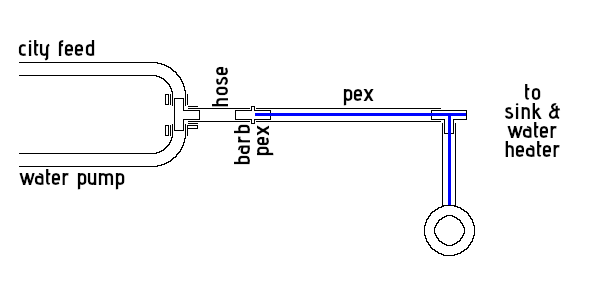
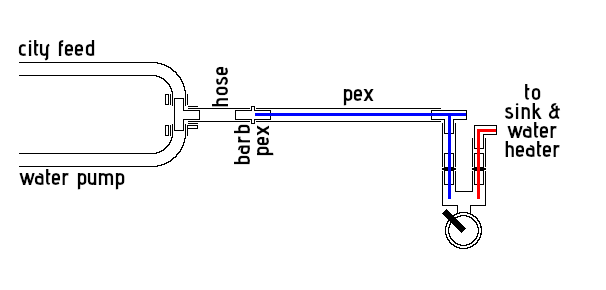
9. Attach the Blue and Red Pex pipe endpoints to the bottom of the base unit closest to where the future connection to the water heater and sink will be made.
10. Pull a 12V positive and negative wire from the water pump in the direction of the 12V fuse box. Add wire connectors to the end of the wire (inside the base unit) and attach the wire to the base unit with wire clamps.
Now the completed Fresh Water Tank base unit can be installed at the chosen location in the van.
Attach the base unit securely to the floor and sides of the van; use Plusnuts or Rivets to fasten the back of the unit to metal inner wall of the vehicle.
At a later time, the two Pex pipes and the 12V power wire can be easily connected to resp. the kitchen base unit and the closest on/off switch and ultimately to a 12V fuse box.
materials
- 0.5” plywood
- metal strap
- 0.5” NPT-to-Barb connector
- thread sealant
- 0.5” flexible hose
- metal hose clamp
- 0.5” T-connector
- 1.5” x 0.5” PVC Bushing
- 0.5” reinforced hose
- pex clamps
- 0.5” Pex-to-Barb connector
- 0.5” Blue Pex pipe
- 0.5” Red Pex pipe
- 0.5” Pex T-connector
- nylon wire clamps
- 12V wire
tools
- screwdriver
- pex clamp tool
- optional: pex cutter
QUESTIONS, SUBMISSIONS OR CORRECTIONS
The missing parts of the complete van conversion process are being added regularly to this Build Guide. If you want to suggest a specific build option for this guide, submit a content correction or have a general inquiry, send me an email.
Error: Contact form not found.
Disclaimer: Throughout this guide, all guidance, building techniques and other information are based on my own experiences of converting a cargo van into a Tiny House on wheels. This guide is only for informational purposes; always build according to local and national standards. Be aware that such a project is expensive, requires a substantial amount of broad knowledge of building techniques and involves more work hours than you can imagine. Besides of hitting a finger with a hammer, much more serious harm can be done when you work with 12V/120V electrical systems, propane installations, power tools, etc. Tapping into the vehicle’s own systems can also damage its functionality. Get professional help where needed; never take any risk!