
Fresh Water Tank Unit
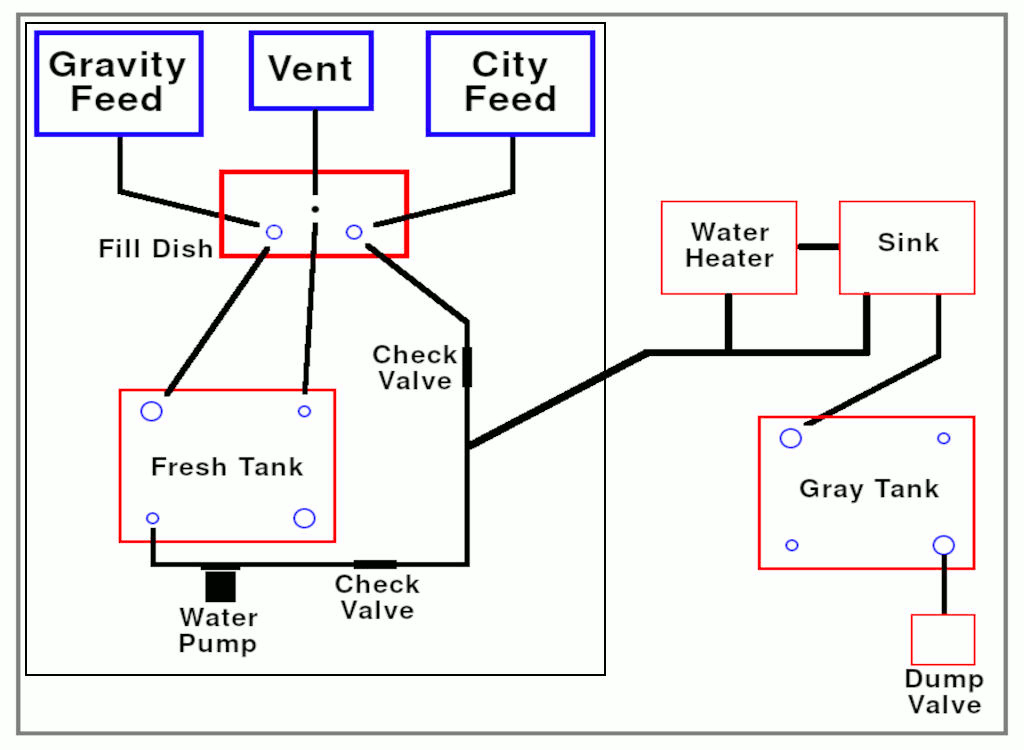
One unit consisting of a tank, a water pump, fill & dump valves and connectors
How To Build & Install
Read through and understand this entire project first and then decide the optimal placement of the cabinet, its material finish and all the desired components. Always keep in mind serviceability.
The fresh water tank is undoubtedly one of the most essential parts of the build; the number of people and your van lifestyle determine its size.
- If you hop from one campground to the other, with perhaps an occasional off-grid experience, a smaller sized fresh water tank has its advantages: you will save space to create more storage and hauling less water will be good for your van’s fuel economy.
- If you otherwise intend to go remote and off-road frequently, with extended dispersed camping without the benefit of expected utilities, you should go BIG! A 20 gallon tank for a single person would then be a minimum size; 40 gallon for two.
- And don’t forget to include your dog(s) in the calculation; their drink water and daily (or more) cleanup sessions could add up.
The fresh water tank is located inside the vehicle to avoid frozen lines in winter. The tank is contained within a standard cabinet unit or one with its size adjusted to the size of the tank for the ease of building and installation. Use the recommended sizes and location or anyway you desire.
This cabinet unit will contain the main tank, pump, fill points & vents, water level indicator and exterior shower, dependent on your choice of components.
Its location influences the stability of the van, the ease of access to its components and in some way the location of kitchen, water heater and possibly toilet.
In general, this Fresh Water Tank unit, would be placed close to the rear doors of the van, to allow access to fill & dump. An alternative location would be near the side sliding door.
The dump line and overflow also need access to underside of the vehicle.
Place it close to or over one of the rear wheel wells to support the weight of the water and try to keep most of the electrical components on the opposite side of the van (water and electricity don’t mix well); thus the weight of the batteries, will counterbalance the weight of the water.
The following video gives a general idea of a similar build.


BUILD GUIDE UPDATE
Be the first to receive an update, when a new Project is added to this Build Guide. I also include a monthly overview of newly posted videos.
Fresh Water Tank Project
Choose your Mod or build this project in the following order.
Part I
Cabinet Unit

In this Build Guide ‘base cabinet units’ are used as individual units, which contain most or all components dedicated to a specific function, such as water supply, kitchen plumbing, battery storage, fridge unit, etc.
Part II
Water Pump

The water pump to be located preferably inside the cavity under the water tank and next to the rear wheel well, as long as it is readily accessible. A strainer before the pump removes debris and a check valve protects the water in the tank.
Part III
Gravity Feed

The gravity feed is usually part of a fill station, that is comprised of the gravity feed, a vent hole and perhaps a city pressurized feed.
They are relatively cheap, yet unsuitable for installation inside a van because of the potential of leaking while driving.
Part IV
Fill Vent

The 0.5” tank vent allows the air inside the tank to be released, when filling the tank with fresh water. While too narrow to be fully sufficient as an overflow, it can also help ease the situation in case of over-filling.
Part V
City Feed

Optional – Adding a city feed to an RV is a usual practice, yet some choose primarily boondocking as a way of life, with campground visits far in between. City water then becomes irrelevant and you can skip to Part VI – Dump Line.
Part VI
Dump Line

The dump line allows the fresh water tank to be emptied for cleaning or storage.
Part VII
Exterior Shower

Optional – While an exterior shower is entirely optional, this small investment offers a heated shower option for yourself and/or a cold alternative, to wash your pet or rinse off your shoes or bike.
Part VIII
Tank Level

Optional – Instead of a set of water level sensors, I install an alternative based on the principal of Communicating Vessels. With the hose connected to the tank, water in the hose balances out to the same level as in the tank. No parts to service or repair.
Part IX
Tank Assembly

After preparing for the assembly of this fresh water base unit, it is time to install the water tank and connect all the hoses. If you haven’t done so yet, assemble the base unit and check how it fits in the van.